
지난 시간에 이어 개발환경 세팅을 진행하고,
데이터 조회까지 해보는 시간을 가져보자.
목차
- 프로젝트 생성 및 아파치 설정
- Nexacro 셋팅
- Nexacro 연동 (1)
- Nexacro 연동 (2) 및 DB 설정
- 테스트
1. Nexacro 연동(2) 및 DB 설정
다들 알다시피 넥사크로는 데이터셋을 이용해 DB와 연동을 하는데, 이 과정이 이루어질 수 있도록 설정을 할 것이다. 그리고 참고로 우리는 mybatis를 사용할 것이다.
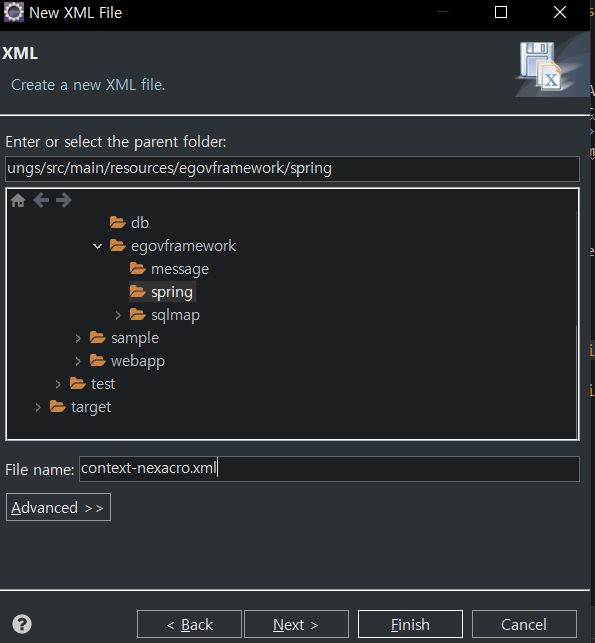
context-nexacro.xml 설정
넥사크로와 mybatis 연동 관련 정보를 설정하기 위해 아래와 같은 경로로 파일 생성
설정 내용 작성
<?xml version="1.0" encoding="UTF-8"?>
<beans xmlns="http://www.springframework.org/schema/beans"
    xmlns:p="http://www.springframework.org/schema/p"
    xmlns:xsi="http://www.w3.org/2001/XMLSchema-instance"
    xmlns:aop="http://www.springframework.org/schema/aop"
    xsi:schemaLocation="
        http://www.springframework.org/schema/beans http://www.springframework.org/schema/beans/spring-beans-4.0.xsd
        http://www.springframework.org/schema/aop http://www.springframework.org/schema/aop/spring-aop-4.0.xsd
        ">

  <bean id="applicationContextProvider" class="com.nexacro.uiadapter17.spring.core.context.ApplicationContextProvider" lazy-init="false" />

  <bean id="oracleDbms" class="com.nexacro.uiadapter17.spring.dao.dbms.Oracle" />

  <bean id="dbmsProvider" class="com.nexacro.uiadapter17.spring.dao.DbVendorsProvider">
      <property name="dbvendors">
          <map>
           <entry key="Oracle"     value-ref="oracleDbms"/>
          </map>
      </property>
  </bean>
</beans>
필자는 oracle을 사용할 것이기 때문에 위와 같이 설정했다.
sql-mapper-config.xml 설정
mybatis에서 Map을 사용할 때 설정할 내용들이다. 기존의 내용을 지우고 아래와 같이 세팅하면 된다.
<?xml version="1.0" encoding="UTF-8"?>
<!DOCTYPE configuration PUBLIC "-//mybatis.org//DTD Config 3.0//EN" "http://mybatis.org/dtd/mybatis-3-config.dtd">

<configuration>
  <!-- myBatis Inteceptor for get column information  -->
  <plugins>
    <!-- NexacroMybatisMetaDataProvider :  Executor Plugin:쿼리를 실행하며,
        List 형태의 데이터 조회 시 조회된 결과가 0건일 경우 결과 메타데이터 정보를 조회
        resultType이 Map 일 경우 추가적으로 메타데이터 조회를 위한 쿼리를 실행한다.  -->
    <plugin interceptor="com.nexacro.uiadapter17.spring.dao.mybatis.NexacroMybatisMetaDataProvider" />
    <!-- NexacroMybatisResultSetHandler :ResultSetHandler Plugin – Executor Plugin에서 메타데이터 조회를 위해 쿼리를 실행하였을 경우에만 동작,
        ResultSetMetaData 와 resultType에 존재하는 필드 정보를 확인하여 메타데이터 정보를 조회 한 다.  -->
    <plugin interceptor="com.nexacro.uiadapter17.spring.dao.mybatis.NexacroMybatisResultSetHandler" />
  </plugins>
</configuration>3. DB 연동 설정
(참고로 필자는 Oracle 19c를 이미 다운로드 받아서 설정했고 SqlDeveloper를 통해 테이블 생성 후 쿼리문 또한 찍어볼 수 있는 상태에서 시작함을 밝힌다..)
pom.xml에서 dependency부터 설정해보자.

위 내용을 추가한다.
참고: src\main\resources\egovframework\spring 하위 경로의 xml파일을 건드릴 것이다.
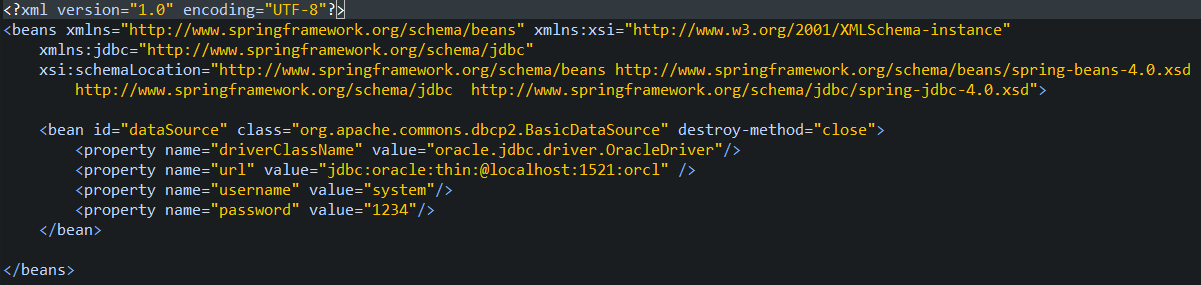
context-datasource.xml 파일 내용 전체다. 다른 내용은 필요없다. 필자는 사용자 이름: system, 비밀번호: 1234, 포트: 1521, SID: orcl로 설정했던 데이터베이스가 있기 때문에 위와 같이 설정했다. 필자와 다르게 설정한 부분이 있다면 그 부분만 본인이 설정한 것으로 작성하면 된다.
그럼 기본적인 DB설정은 끝났고, 테스트를 위해 Mybatis를 활용해 Select쿼리를 날려보자.
4. 테스트
필자는 Controller, Service, Repository 계층으로 테스트를 진행해볼 것이고 Mybatis를 사용할 것이다.
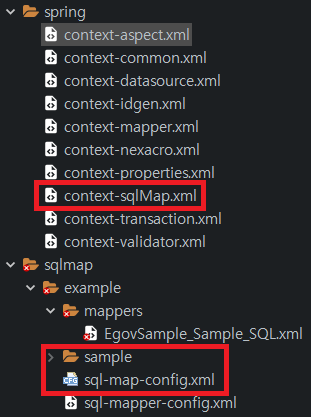
테스트 코드 작성하기 전, 필자는 mybatis를 사용할 것이기 때문에 ibatis 내용인 context-sqlMap.xml과 sql-map-config.xml 파일을 삭제하겠다. 그리고 sqlmap/example/mappers 하위에 있는 xml파일을 mybatis로 사용할 것이다. (sample 폴더 및 하위 파일은 그냥 필요없으므로 삭제!)
패키지 파일 구조

참고로 필자는 위와 같은 패키지 경로로 파일들을 나누고 생성했다. 그리고 에러가 발생하지 않는 선에서 웬만하면 Generate Example로 생성된 파일 내용들을 좀 걷어내고 작성했다는 점 참고바란다.
VO 파일 작성

SearchConditionVO는 위와 같이 작성했고 SampleVO는 Generate Example로 생성된 파일 그대로 사용한다. 패키지 경로만 위와 같이 바꿔주자!
mapper xml 파일

위와 같은 경로의 EgovSample_Sample_SQL.xml 파일의 내용을 아래와 같이 작성해준다.
<?xml version="1.0" encoding="UTF-8"?>
<!DOCTYPE mapper PUBLIC "-//mybatis.org//DTD Mapper 3.0//EN" "http://mybatis.org/dtd/mybatis-3-mapper.dtd">
<mapper namespace="egovframework.example.sample.service.impl.NexacroMapper">

	<resultMap id="sample" type="egovframework.example.sample.service.vo.SampleVO">
		<result property="id" column="ID"/>
		<result property="name" column="NAME"/>
		<result property="description" column="DESCRIPTION"/>
		<result property="useYn" column="USE_YN"/>
		<result property="regUser" column="REG_USER"/>
	</resultMap>

	<!-- 예제 코드 -->
	<select id="selectSampleList" parameterType="egovframework.example.sample.service.vo.SearchConditionVO" resultMap="sample">
      SELECT
        ID, NAME, DESCRIPTION, USE_YN, REG_USER
      FROM SAMPLE
      WHERE 1=1
      <if test="keyword != null and keyword != ''">
            <choose>
                <when test="searchType == 'ID'">
            AND ID LIKE '%' || #{keyword} || '%'
          </when>
                <when test="searchType == 'NAME'">
            AND  NAME LIKE '%' || #{keyword} || '%'
          </when>
        </choose>
      </if>
      ORDER BY ID ASC
    </select>

</mapper>
Repository(Mapper interface) 작성

Service Interface 작성

Service 구현체 작성

Controller 작성
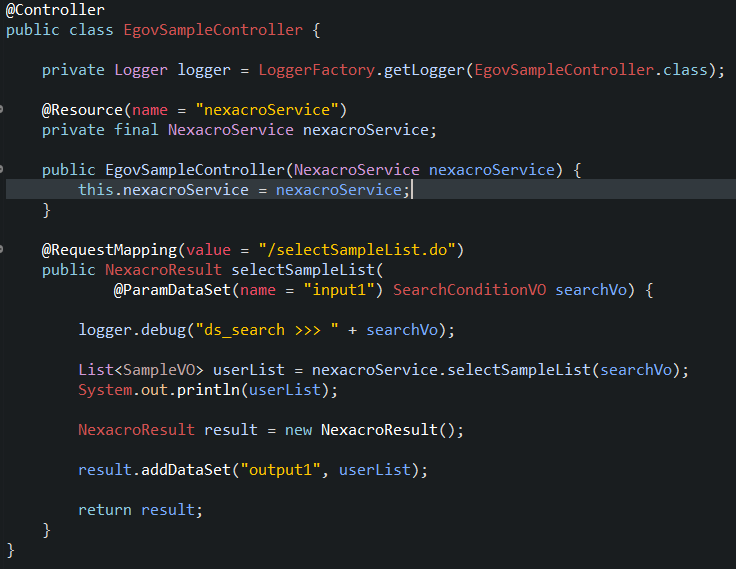
위 코드처럼 작성하면 Controller, Service, Repository layer를 완성시킨 것이다. 그럼 테스트를 돌려보자!!
License error 직면

라이센스가 없다는 에러가 나온다. 그렇다... 우리는 라이센스를 등록하지 않았다. 혹시 Nexacro 셋팅 part에서 Nexacro studio에 사용할 라이센스를 등록하기 위해 이메일로 발급 받았던 것이 기억이 나는가? 해당 메일에 들어가면 다음과 같은 xml파일이 있을 것이다. 그것을 다운로드 받자.

이때 the most important thing이 있다!! 바로 파일 이름을 nexacro17_server_license.xml로 바꿔줘야 한다는 것이다!
우리가 비록 nexacroN을 사용하지만 pom.xml과 dispatcher-servlet 등 각 파일들을 확인해보면 nexacro17 버전으로 내용을 설정했었기 때문이다. 필자는 이 부분에서 가장 많은 시간을 할애한 것 같다.. 왜냐하면 필자가 참고한 글에서는 nexacroN 관련 jar파일들은 tobesoft의 사이트에서 다운로드 받았는데, 그 사이트가 없다고 떠서 nexacroN 관련 jar파일들을 어떻게 설정해야하는지를 몰랐기 때문이다... 혹시 nexacroN관련 jar파일을 받을 수 있는 곳이나 코드를 알고 계신 분이 있다면 필자에게도 공유해주시면 그 분은 진정한 giver.....
어쨌든 그래서 필자는 다른 방법을 시도한 끝에 nexacro17로 모든 파일의 내용을 설정하고 server license의 이름을 위와 같이 수정만하면 사용할 수 있다는 성공 사례를 토대로 프로젝트를 진행할 것이다.
License 주입

위와 같은 경로에 라이센스를 주입해준다. 그리고 테스트를 다시 진행해보면?

원하는 데이터를 입력하고 조회 버튼을 클릭하면 데이터가 조회되는 것을 확인할 수 있다. 혹시 라이센스를 주입했음에도 불구하고 license not found 에러가 발생한다면, 에러를 통해서 프로그램이 라이센스를 찾는 경로를 보고 해당 경로에 nexacro17_server_license.xml 파일을 주입시켜주면 된다. 필자도 다른 경로에 라이센스를 주입했던 경험이 있다..
에러도 많고 탈도 많았던 넥사크로 연동... 이제 꽃길만 걷자... 넥사크로 참고 자료 만들어주신분들 전부 감사드립니다...ㅠㅠ
참고 글
https://www.playnexacro.com/#show:learn:4697
play nexacro:플레이 넥사크로
Play Nexacro is a community site for nexacro platform. 넥사크로 플랫폼 사용자 커뮤니티
www.playnexacro.com
'스프링 > Nexacro' 카테고리의 다른 글
| 전자정부프레임워크 + 넥사크로 + Oracle 연동 (2) | 2024.03.13 |
|---|